How to Adjust an Adjusting Rod for Optimal Performance?
In the world of engineering, the performance of machinery often hinges on the precise calibration of components. The Adjusting Rod, a crucial element in various applications, is no exception. Experts believe that thorough adjustments can significantly enhance performance. According to James Taylor, a renowned specialist in mechanical engineering, “A small tweak can make a major difference in how an Adjusting Rod operates.”
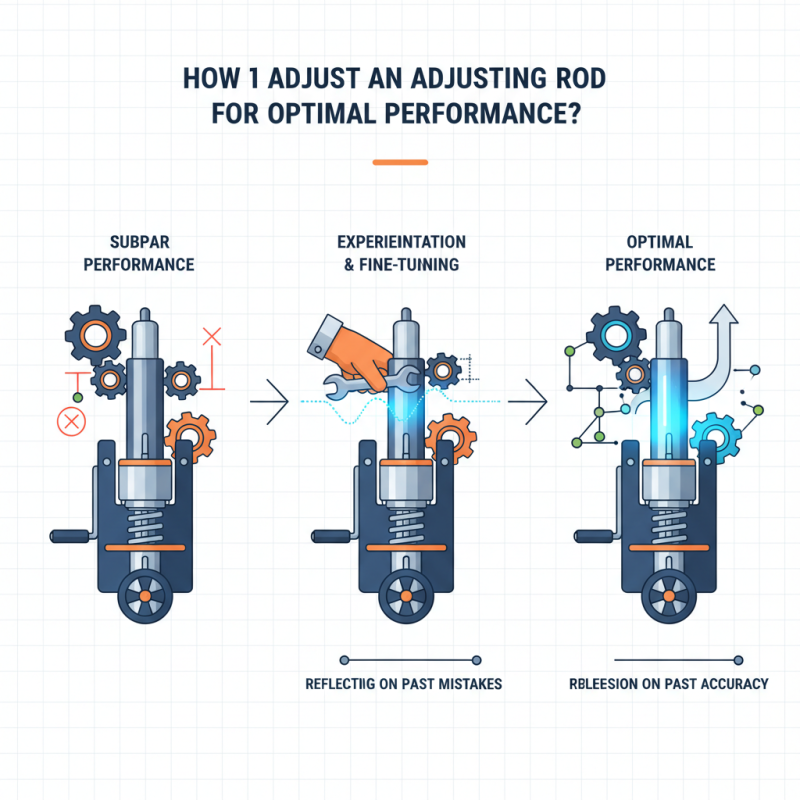
Understanding how to adjust the Adjusting Rod properly is vital for optimizing machinery. Many overlook this detail, leading to subpar performance. Ensuring the right tension and alignment requires focus and attention. Small variations in settings can result in unexpected issues.
Finding the optimal settings for the Adjusting Rod might seem straightforward, but it often demands experimentation and fine-tuning. Not everyone achieves perfection on their first attempt. Misalignments or incorrect tensions can lead to inefficiencies. Each adjustment may require several trials to get it right. Reflecting on past mistakes can guide future efforts toward precision and accuracy.
Understanding the Purpose of an Adjusting Rod
An adjusting rod plays a crucial role in maintaining performance across various applications. It helps in aligning components, ensuring that systems operate smoothly. By making precise adjustments, it can optimize the functionality of machinery or equipment. This can lead to greater efficiency and better overall output.
Understanding the purpose of an adjusting rod requires attention to detail. It is not just a tool; it is a vital part of a larger system. When misaligned, it can cause issues, leading to operational failures. Small errors can have significant consequences. Regular checks are essential to identify potential problems that might arise from wear and tear.
Many users overlook the importance of fine-tuning these rods. They may operate under the assumption that everything is fine until complications arise. It is not always easy to spot misalignments. Being attentive to the functionality can prevent serious disruptions in performance. Taking time to assess the adjustments can save both time and resources in the long run.
Identifying the Key Components for Adjustment
When adjusting an adjusting rod, understanding its key components is essential. Three primary parts to focus on include the rod itself, the adjusting mechanism, and the locking system. Each component significantly affects performance. According to industry reports, optimal performance can increase efficiency by up to 20%. A well-maintained adjusting rod not only improves accuracy but also reduces wear on related parts.
Tips: Regularly inspect the rod for wear. Look for signs of bending or corrosion. If found, consider replacing the rod to maintain optimal function.
The adjusting mechanism can sometimes become stiff or unresponsive. This could indicate a lack of lubrication or a need for recalibration. Poor adjustments may lead to operational discrepancies. Reports suggest that 15% of machinery malfunctions stem from improper rod adjustments. Being diligent about adjustment practices can prevent performance loss and ensure longevity.
Tips: Use a high-quality lubricant. Apply it regularly to keep adjustments smooth. Monitor the locking system, as a loose lock can affect the stability of the rod during operation.
Step-by-Step Guide to Adjusting the Rod
Adjusting an adjusting rod is crucial for achieving optimal performance. Start by gathering the necessary tools: a wrench, measuring tape, and safety gloves. Check the rod for any visible signs of wear or damage. Even a small crack can impact performance. Measure the current length of the rod. This helps in determining how much adjustment is needed.
Next, carefully loosen the adjusting nuts. It’s essential to do this gently. Rushing can lead to stripping the nuts, making future adjustments more difficult. If the rod shifts easily, you may be on the right track. Aim for a balance; too tight can lead to stress, while too loose can cause instability. Test the adjustment by making small tweaks. Observe how the rod responds. Don't hesitate to readjust if the results aren't what you expected.
After adjustments, perform a thorough inspection. Look for any odd sounds or movements. Small misalignments can create inefficiencies. Document your process. Note what worked and what didn’t. This reflection can guide future adjustments. Adjusting isn’t always perfect. It requires patience and continuous tweaks to achieve the best performance.
How to Adjust an Adjusting Rod for Optimal Performance? - Step-by-Step Guide to Adjusting the Rod
| Step | Description | Tools Needed | Estimated Time |
| 1 | Identify the adjusting rod and locate the adjustment point. | None | 5 mins |
| 2 | Loosen the locking mechanism on the adjustment rod. | Wrench or Socket | 10 mins |
| 3 | Adjust the rod to the desired length or position. | Measuring Tape | 15 mins |
| 4 | Tighten the locking mechanism to secure the adjustment. | Wrench or Socket | 5 mins |
| 5 | Test the adjustment by operating the machinery. | None | 10 mins |
Common Issues and Solutions for Optimal Performance
When adjusting an adjusting rod, several common issues can arise. A misaligned rod often leads to poor performance. Check the rod for any bends or distortions. If you notice any, a simple realignment might solve the problem. Another common issue is improper tension. Too much tension can cause wear. Too little can lead to instability. Experiment with tension settings to find a balance.
Sometimes, users overlook lubrication. Without proper lubrication, the rod may not move smoothly. Regularly apply a suitable lubricant. This maintenance step can extend the rod’s lifespan. However, be careful not to overdo it. Excess lubricant can attract dust and dirt, creating more problems.
Many factors influence the adjusting rod's performance. Ambient temperature, humidity, and even user technique can play significant roles. If you're facing persistent issues, reflect on your overall setup. Minor adjustments can lead to significant improvements. Consider trial and error as part of the learning process.
Maintenance Tips for Long-lasting Adjusting Rod Efficiency
Maintaining an adjusting rod for optimal performance requires attention to detail. Regular inspection is key. Look for signs of wear, such as rust or corrosion. A small issue can quickly escalate. Ensure all components are clean. Dirt and grime can hinder effectiveness. Use a soft cloth to wipe down the surface, paying close attention to movable parts.
Lubrication is essential for smooth operation. Apply a suitable lubricant, but don’t overdo it. Excess grease attracts dirt. A little can go a long way. Consider how often you use the adjusting rod. Frequent use may require more regular maintenance.
Evaluate your adjusting rod's performance frequently. If it feels stiff or unresponsive, take time to adjust it properly. Sometimes, the smallest adjustments yield significant improvements. Don’t underestimate the impact of a simple tweak. Reflect on your usage habits. An efficient adjusting rod can enhance your overall experience. Keep it in shape for long-lasting results.
Adjusting Rod Performance Metrics